
I’ll guide you through two methods for creating a PDF from an Excel file using Power Automate.
- Option 1: Use the free, built-in Power Automate connectors.
- Option 2: Use the Encodian connector, which is free for a limited number of actions and offers additional flexibility.
This step-by-step guide demonstrates how to convert an uploaded Excel file into a PDF, store it in a specific SharePoint document library.
Option 1: Using Free Connectors
The following are the pre-requisites for this method:
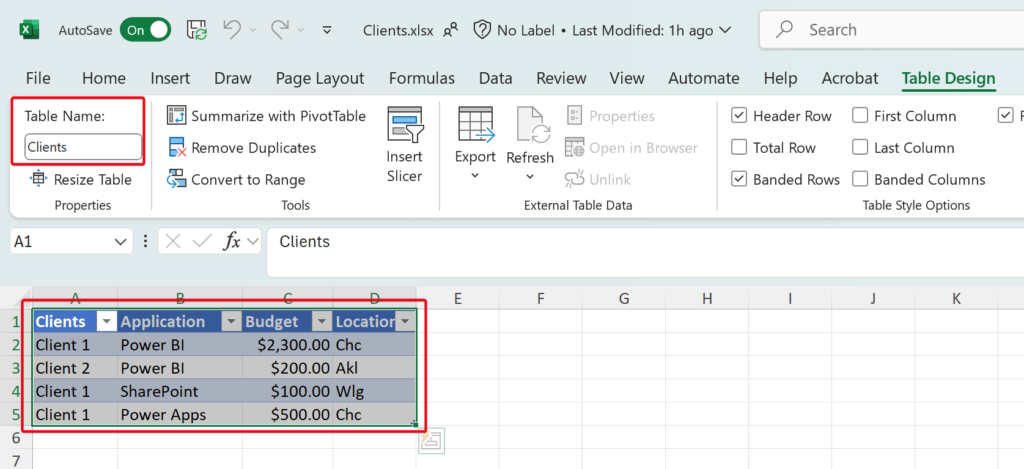
The Excel file you want to convert must have a table defined. Here’s how to set it up:
- Open your Excel file in Excel Online or the desktop application.
- Highlight the data you want to include in the PDF.
- Navigate to the Insert tab in the ribbon and select Table.
- In the Create Table dialogue box, ensure the “My table has headers” checkbox is checked (if your data has headers) and click OK.
Power Automate Setup
1. Manually Trigger a Flow
To keep things simple, start by creating a new flow in Power Automate. Choose “Instant cloud flow” and select “Manually trigger a flow” as the trigger. This allows you to start the flow manually when needed.
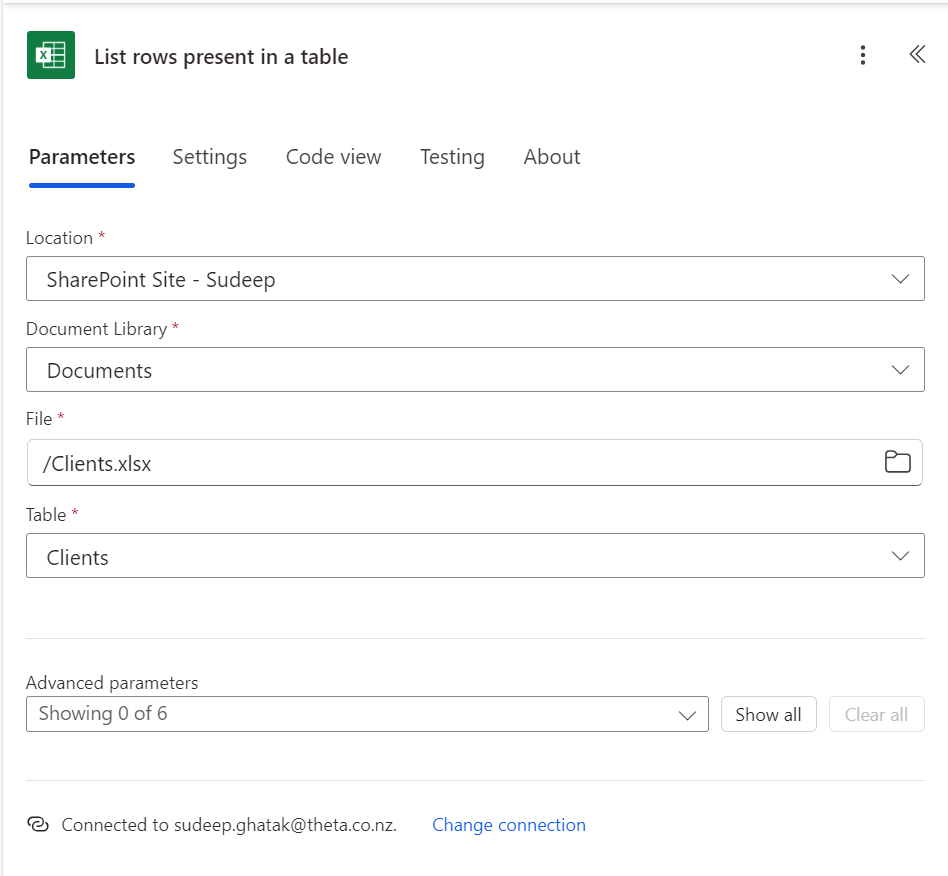
2. List Rows Present in a Table
- Add the “List rows present in a table” action.
- Connect to your Excel file stored in OneDrive or SharePoint.
- Specify the file path and table name. Ensure your Excel file has a defined table with the data you want to convert.
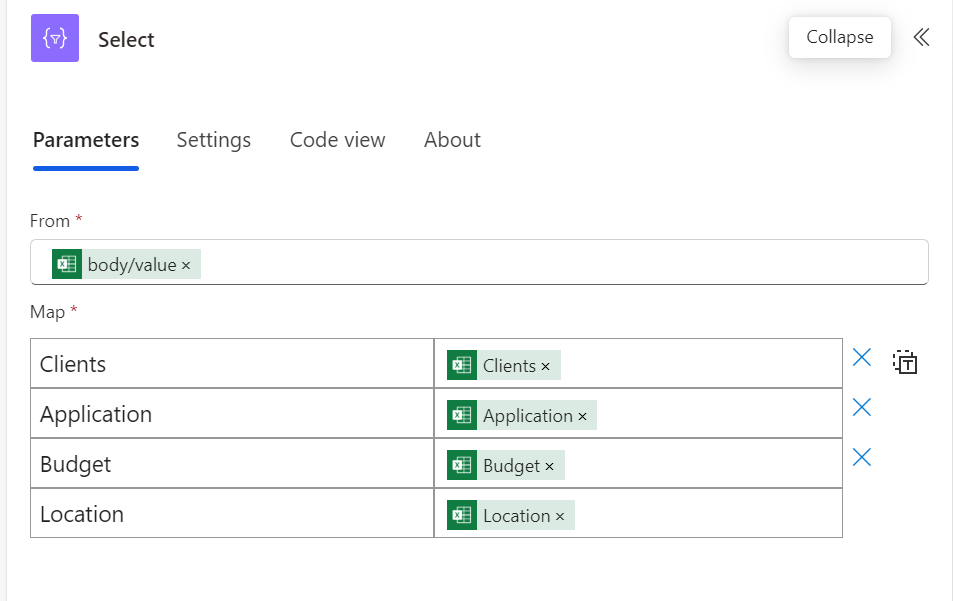
3. Select
The Select action lets you pick the columns you want to export in PDF. You can skip this step if you want to export all columns
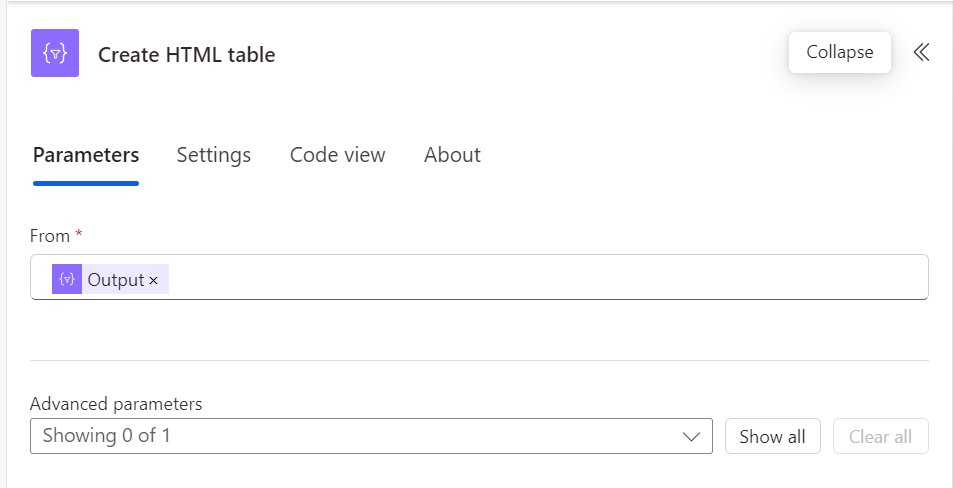
4. Create HTML Table
- Add the “Create HTML table” action.
- Set the From field to the output of the previous action (
Select). - Choose “Custom” for the Table Layout to modify the column headers or data formatting as required.
5. Compose Styles
To style your HTML table, add a “Compose” action and define custom CSS styles. For example:
<style>
	table {
          border-collapse: collapse;
	}
        table td, table th {
          border: 1px solid #AAAAAA;
          padding: 3px 10px;
        }
       table tr:nth-child(even) {
          background: #D9E1F2;
	}
	table thead {
	  background: #4472C4;
	}
	table thead th {
	  font-size: 15px;
          font-weight: bold;
          color: #FFFFFF;
          text-align: left;
	}
	table tfoot {
 	 font-weight: bold;
	}
</style>
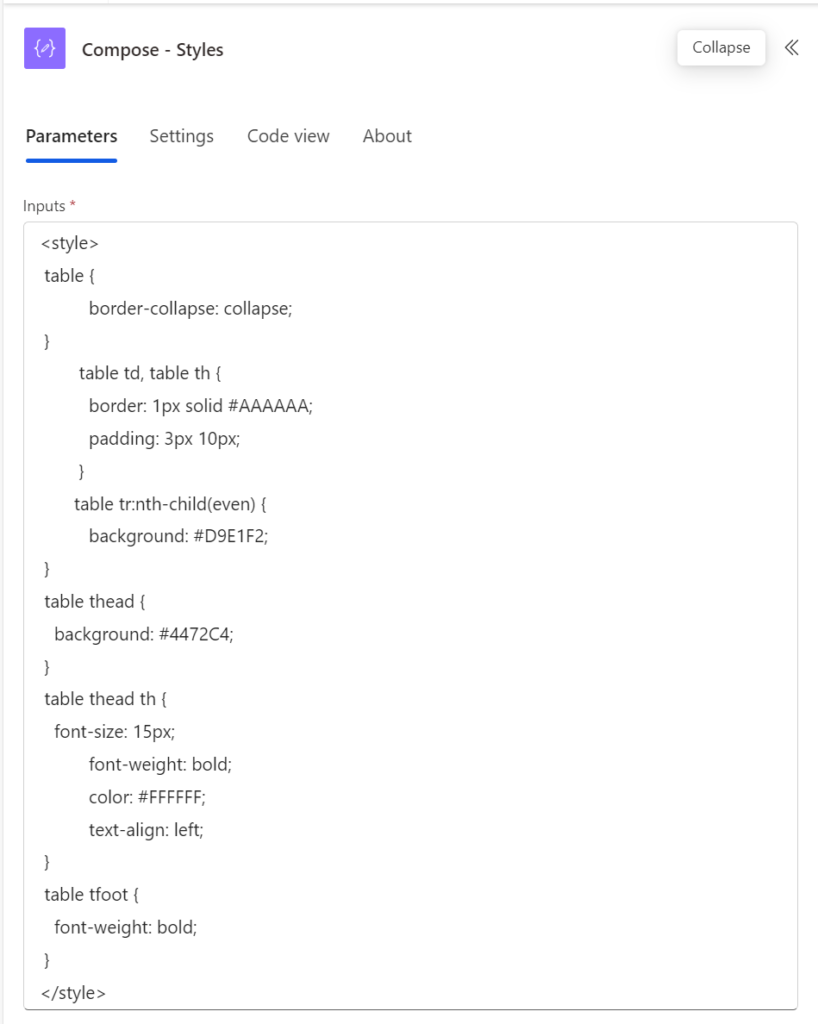
This ensures the resulting table looks polished when converted to a PDF.
6. Create File
- Add the “Create file” action to generate an HTML file.
- Specify the location (OneDrive or SharePoint) where you want to save the file.
- Use a
.htmlextension for the file name (e.g.,myReport.html). - For the file content, combine the CSS styles and the HTML table using an expression like:
concat(outputs('Compose_Styles'), outputs('Create_HTML_table'))
7. Convert File
- Add the “Convert file” action.
- Select the previously created HTML file as the source.
- Choose PDF as the conversion format.
- Specify a destination to store the converted file temporarily.

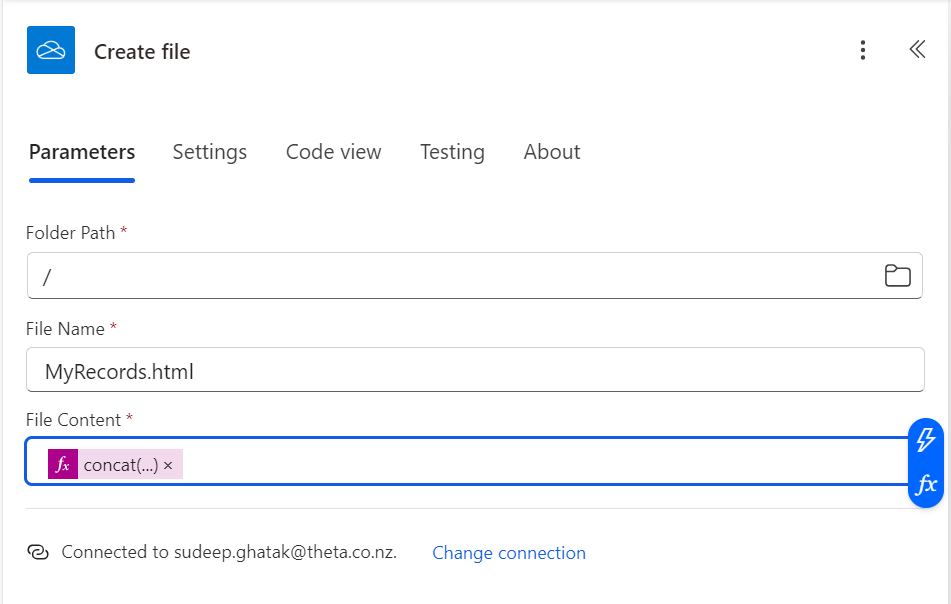
8. Create File (SharePoint)
- Add another “Create file” action to save the final PDF to your desired location.
- Site address: Your SharePoint site.
- Folder Path: Specify where the PDF should be stored.
- File Name: file name (e.g.,
myRecords.pdf). - File Content: Dynamic content: “File content” (from the Convert file action).

10. Delete PDF from OneDrive
- Add another Delete file action (OneDrive connector):
- File: Dynamic content: “Id” (from the Create file action in OneDrive).

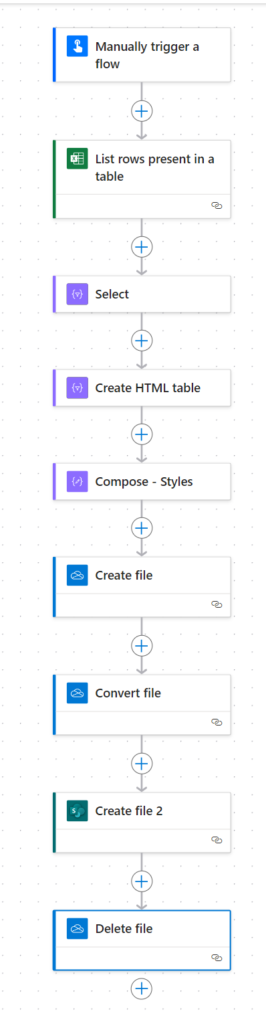
The full flow
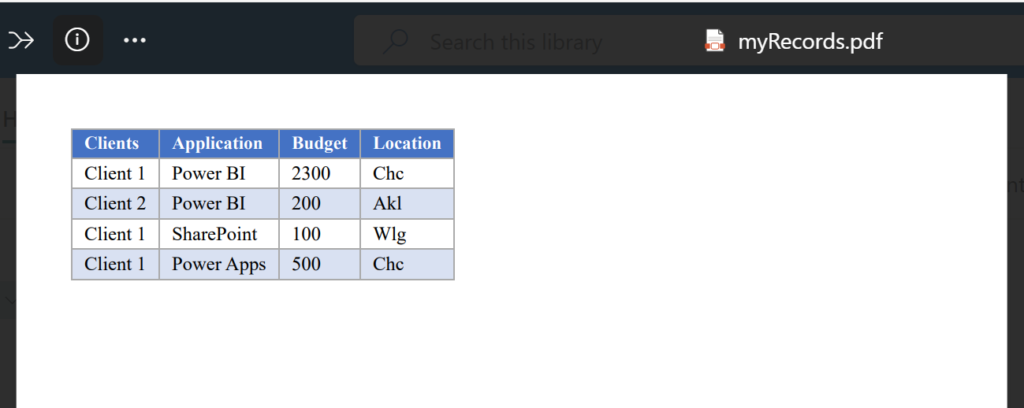
Final Output
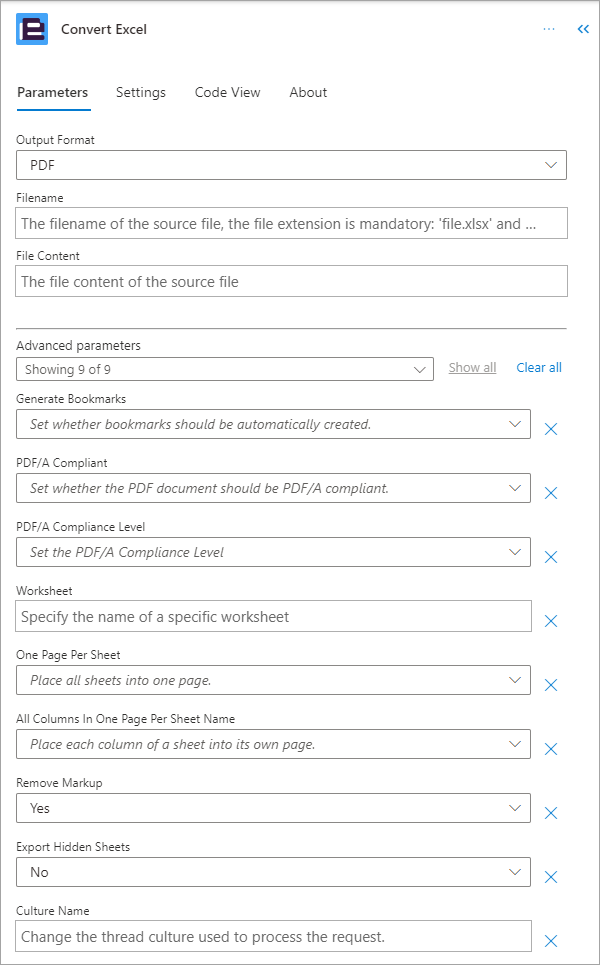
Option 2: Using Encodian
Encodian is a third-party connector for Power Automate that simplifies the conversion process and adds advanced functionality. While the connector is free for up to 50 credits a month, it can be a great alternative for more complex requirements.
Steps for Using Encodian
- Install Encodian Connector:
- Navigate to the Power Automate connectors gallery and add the Encodian connector to your flow.
- Trigger Setup:
- Follow the same trigger setup as outlined above to detect when an Excel file is uploaded to SharePoint.
- Encodian Convert Excel to PDF Action:
- Add the Encodian Convert Excel to PDF action.
- Configure the action with:
- Source file URL: Dynamic content: “Path” from the trigger.
- Output file format: Select PDF.
- Store the PDF in SharePoint:
- Add a Create file action to store the converted PDF in your desired SharePoint location.
Encodian offers additional features like customizing the output file and handling large files seamlessly.